Creating Layer 2 Connections to Google

This section outlines the process to create Google Cloud Partner Interconnect circuits using the Google Console and how to provision Layer 2 circuits (EVCs) to Google Cloud using the Open Cloud Exchange®. Before this process can begin, the Open Cloud Exchange port(s) must be operational, and the customer must have an active Google Account.
STEP 1: CREATING THE GCP VLAN ATTACHMENT
Prior to ordering your EVC from CoreSite you must create your VLAN Attachment in the Google Cloud Platform Console. To login into the console, you can click here:
- From the Dashboard, click on the menu icon at the top left corner of the screen to reveal the menu blade. (Figure 1A)
NOTE: If you have multiple projects created, ensure you are in the correct project. Click on the drop-down menu in the blue bar at the top of the page next to ‘Google Cloud Platform’. Scroll down to the ‘NETWORKING’ section. (Figure 1B).
- Click on the ‘VLAN attachments’ tab.
- Click on the ‘Add VLAN attachment’ button.
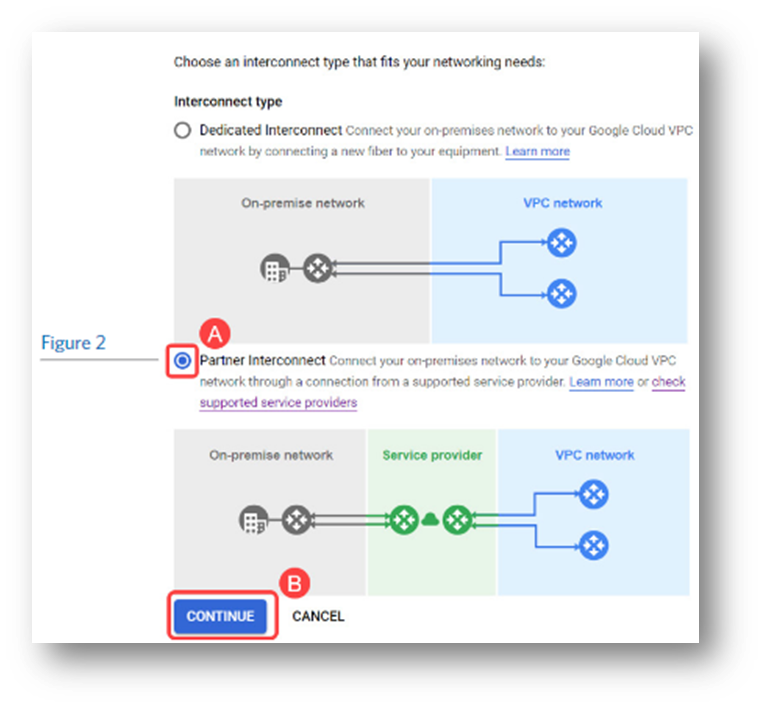
- Select the radio button next to ‘Partner Interconnect’ and click the ‘CONTINUE’ button. (Figure 2A and 2B)
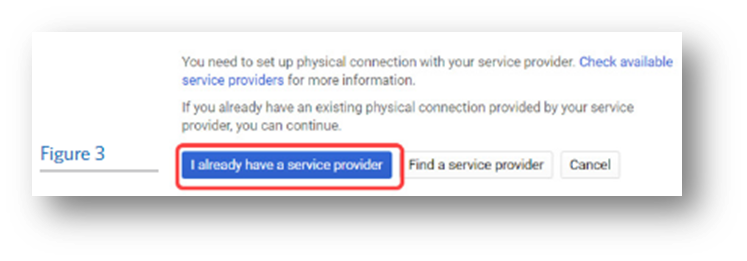
- Click on the ‘I already have a service provider’ button. (Figure 3)
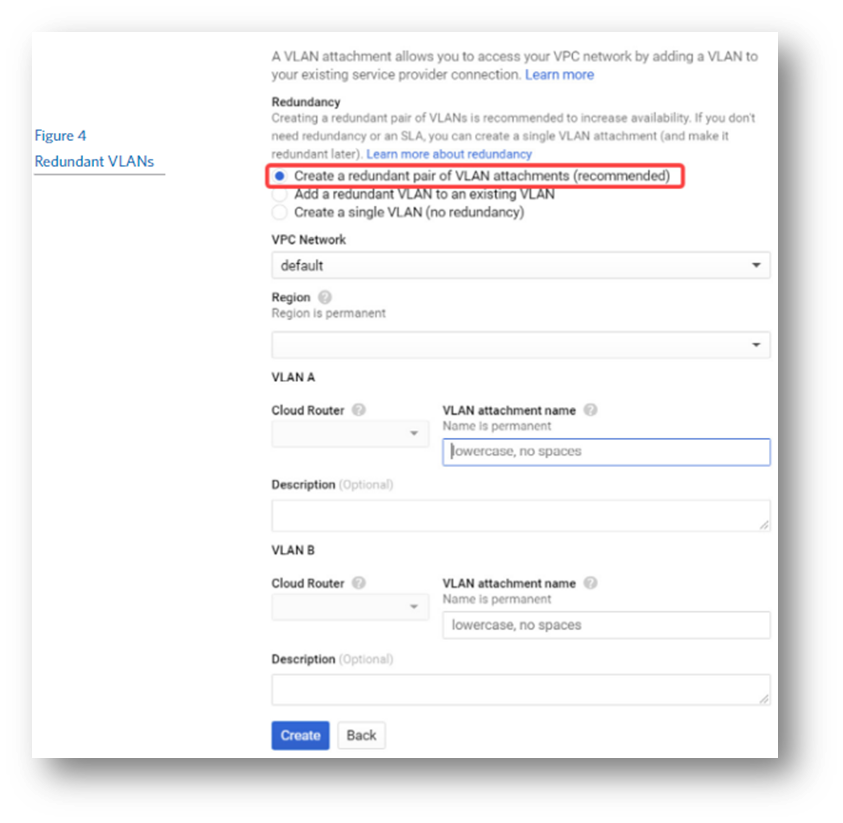
Creating a Redundant Pair of VLAN Attachments [recommended]
- Select the radio button next to ‘Create a redundant pair of VLAN attachments (recommended)’ and complete the following fields (Figure 4):
- VPC Network: Choose a previously created VPC network from the drop-down menu.
- Region: Choose the appropriate region from the drop-down menu.
- VLAN A, Cloud Router: Choose a previously created Cloud Router from the drop-down menu. This is usually for the primary EVC.
- VLAN attachment name: Name the VLAN attachment. All lower case, no spaces, and up to 62 characters.
- (Optional) Description: Provide a description of the VLAN attachment.
- VLAN B, Cloud Router: Choose a previously created Cloud Router from the drop-down menu. This is usually for the secondary EVC.
- VLAN attachment name: Name the VLAN attachment. All lower case, no spaces, and up to 62 characters.
- (Optional) Description: Provide a description of the VLAN attachment. This is an optional field. Click on the ‘Create’ button.
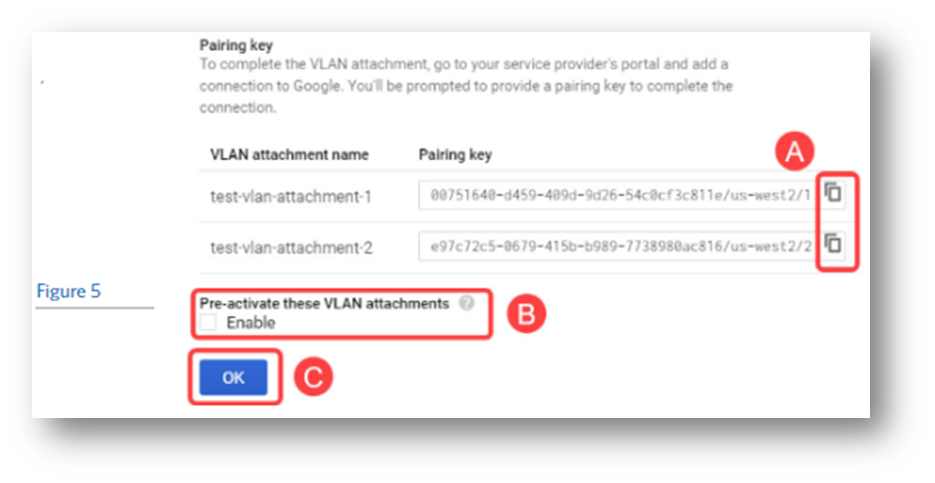
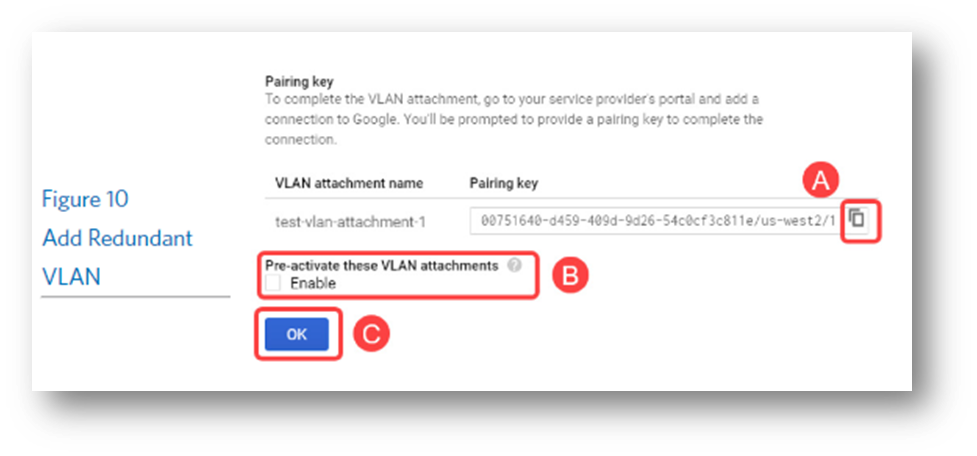
- Once complete, a set of pairing keys will be displayed next to the VLAN attachment names.
- Click on the ‘Copy’ icon button just to the right of the pairing-key and save it somewhere (e.g. Notepad, Slack, etc.). (Figure A)
- You will be required to enter and validate the pairing-keys when you order your Open Cloud Exchange EVCs.
- (Optional) Pre-activate these VLAN attachments: Check the box next to ‘Enable’. (Figure B). Please note - You can pre-activate the VLAN attachments at a later time.
- Click on the ‘OK’ button. (Figure C)
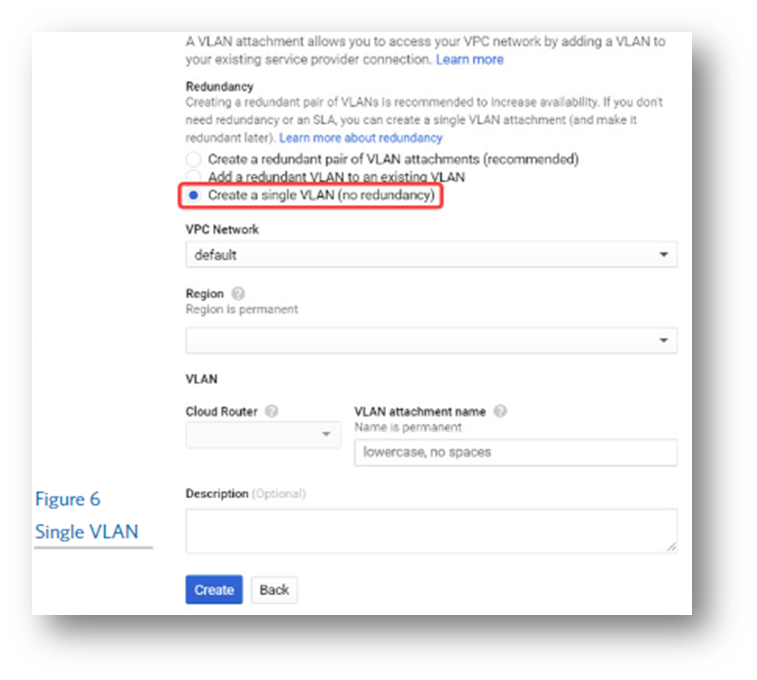
Creating a Single VLAN Attachment
- Select the radio button next to ‘Create a single VLAN (no redundancy)’ and complete the following fields (Figure 6):
- VPC Network: Choose a previously created VPC network from the drop-down menu.
- Region: Choose the appropriate region from the drop-down menu.
- VLAN, Cloud Router: Choose a previously created Cloud Router from the drop-down menu.
- VLAN attachment name: Name the VLAN attachment. All lower case, no spaces, and up to 62 characters.
- (Optional) Description: Provide a description of the VLAN attachment.
- Click on the ‘Create’ button.
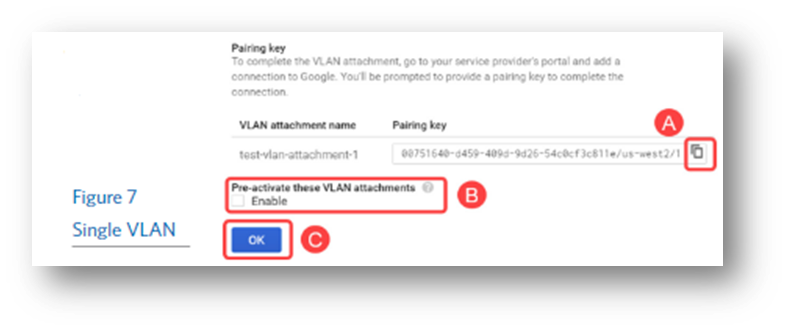
- Once complete, a pairing-key will be displayed next to the VLAN attachment name.
- Click on the ‘Copy’ icon button just to the right of the pairing-key and save it somewhere (e.g. Notepad, Slack, etc.). (Figure 7A)
- You will be required to enter and validate the pairing-key when you order your Open Cloud Exchange EVC
- (Optional) Pre-activate these VLAN attachments: Check the box next to ‘Enable’ (Figure 7B). Note - You can pre-active the VLAN attachment later.
- Click on the ‘OK’ button (Figure 8C).
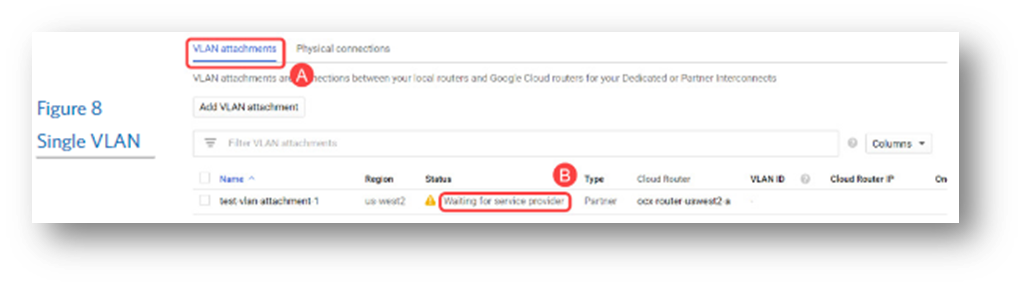
- The newly created VLAN attachment will now be listed within the ‘VLAN attachments’ tab. (Figure 8A)
- Under the ‘Status’ column, the state will be listed as: Waiting for service provider. (Figure 8B)
Add a Redundant VLAN to an Existing VLAN
- Select the radio button next to ‘Add a redundant VLAN to an existing VLAN’. Complete the following fields:
- Select VLAN attachment: From the drop-down the menu, choose an existing VLAN attachment that you want to provide redundancy to. The new VLAN that you create will use the same region and network, making a redundant pair.
- Redundant VLAN, Cloud Router: Choose a previously created Cloud Router from the drop-down menu. The Cloud Router that’s grayed out (not selectable) means it already assigned to the redundant VLAN attachment.
- VLAN attachment name: Name the VLAN attachment. All lower case, no spaces, and up to 62 characters.
- (Optional) Description: Provide a description of the VLAN attachment.
- Click on the ‘Create’ button.

- Once complete, the pairing-key will be displayed next to the VLAN attachment name.
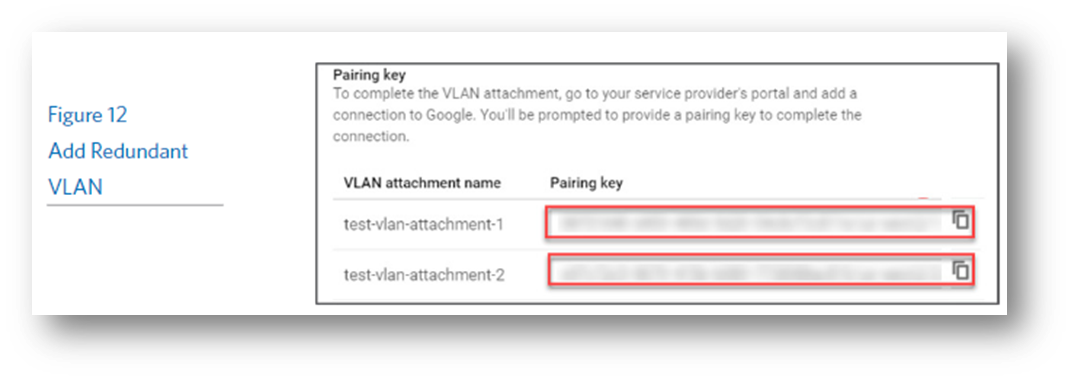
- Click on the ‘Copy’ icon button just to the right of the pairing-key and save it somewhere (e.g. Notepad, Slack, etc.). (Figure 10A)
- You will be required to enter and validate the pairing-key when you order your Open Cloud Exchange EVC.
- (Optional) Pre-activate these VLAN attachments: Check the box next to ‘Enable’. (Figure 10B). Note - You can pre-active the VLAN attachment later.
- Click on the ‘OK’ button. (Figure 10C)
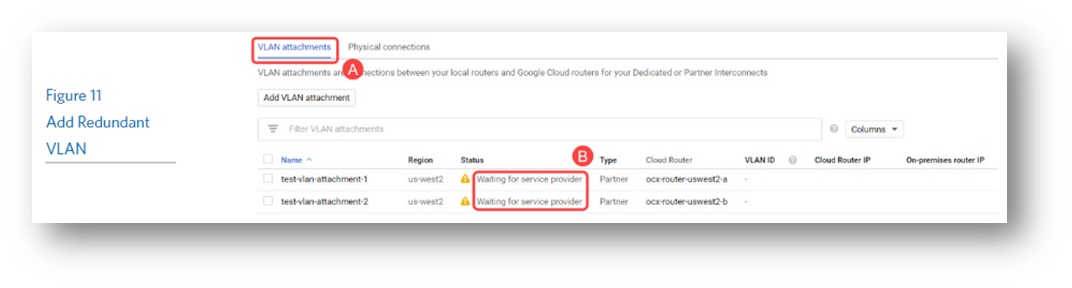
- The newly created VLAN attachment will now be listed within the ‘VLAN attachments’ tab. (Figure 11A)
- Under the ‘Status’ column, the state will be listed as: Waiting for service provider. (Figure 11B)
- Under the ‘Status’ column, the state will be listed as: Waiting for service provider. (Figure 11B)
- When your VLAN Attachment is completed, your Google Pairing Key will appear next to your VLAN Attachment Name(s) and will be required to complete the next step in creating your EVC in the CoreSite Portal:
STEP TWO: ORDERING YOUR OPEN CLOUD EXCHANGE EVC
- Login to the MyCoreSite customer portal
- Select Order Services & Support
- Choose Interconnection
- Order OCX
- Select EVC
- Click Order
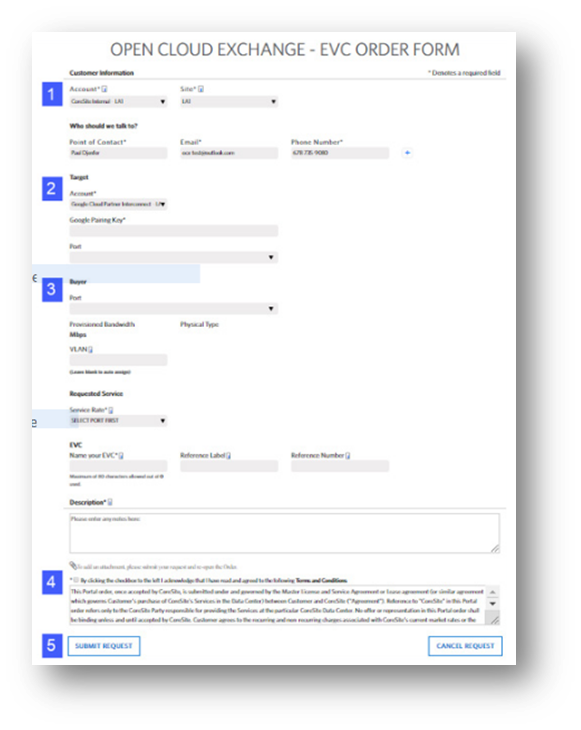
NEW EVC(S) ORDER FORM – Google
- Input Contact Information
- Select Account and Site
- Enter the Point of Contact (Up to 5 contacts)
- Select Target
- Account – Google Cloud Platform Interconnect
- Google Pairing Key – Captured in Figure 8; note your pairing key identifies your edge domain
- Port – Select target port
- Enter Buyer Details
- Port – Populate buyer port
- Buyer VLAN (Available range: 400-899 or leave blank for auto selection)
- Service Rate
- 50, 100, 200, 300, 400 or 500 Mbps
- 1, 2, 5 or 10 Gbps
- Name your EVC
- Enter a Description
- Agree to Terms and Conditions
- Press Submit Order
STEP THREE: CONFIRM THE ATTACHMENT
- After submitting the order, the EVC(s) will be configured and confirmation emails are sent to the buyer and target with the connection details including the relevant buyer and target VLAN information.
- Within the GCP portal the state will change to one of the following after the EVC provisions successfully.
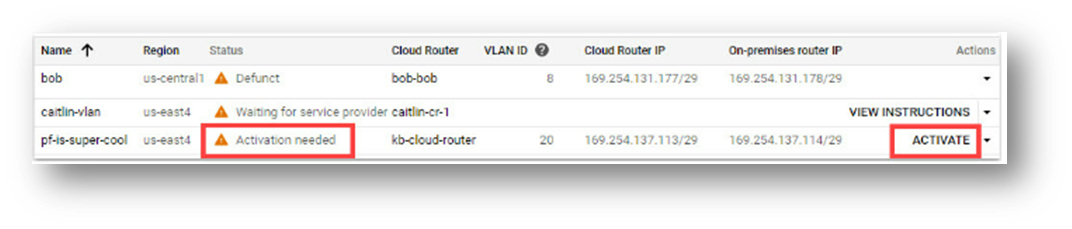
- VLAN attachment not pre-activated: Activation needed
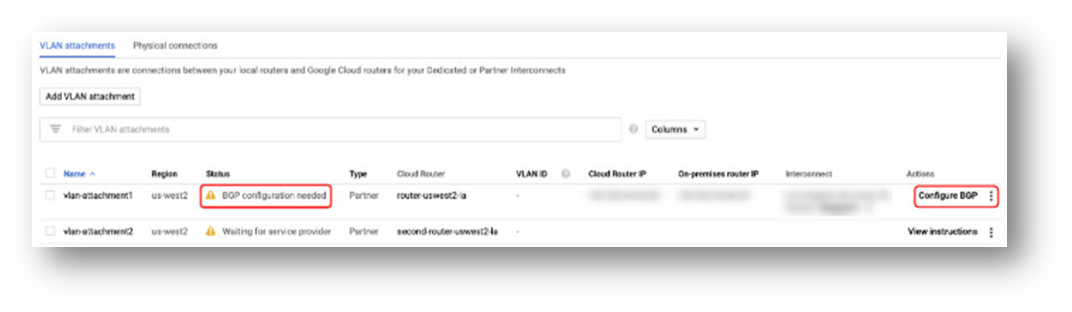
- VLAN attachment pre-activated: BGP configuration needed
- VLAN attachment not pre-activated: Activation needed