Creating Layer 2 Connections to Oracle Cloud

This section outlines the process to create Oracle FastConnect circuits in the Oracle Console using an Oracle Provider and how to provision L2 circuits (EVCs) to Oracle FastConnect using the Open Cloud Exchange®. Before this process can begin, the Open Cloud Exchange port(s) must be operational, and the customer must have an active Oracle account.

STEP 1: ORACLE CLOUD CONSOLE
Prior to ordering your EVC from CoreSite you must create your virtual circuit(s) in the Oracle Cloud Console. To login into the console, you can click here. When creating your virtual circuits, you will be given the option to create public or private circuits. For detail on how to create your virtual circuit see below:
Creating a Virtual Circuit
- From the Dashboard, click on the menu icon (bars) at the top left corner of the screen to reveal the menu blade. (Figure 1A)
- Under ‘Core Infrastructure’, select ‘Networking’ and then click on ‘FastConnect’. (Figure 1B)
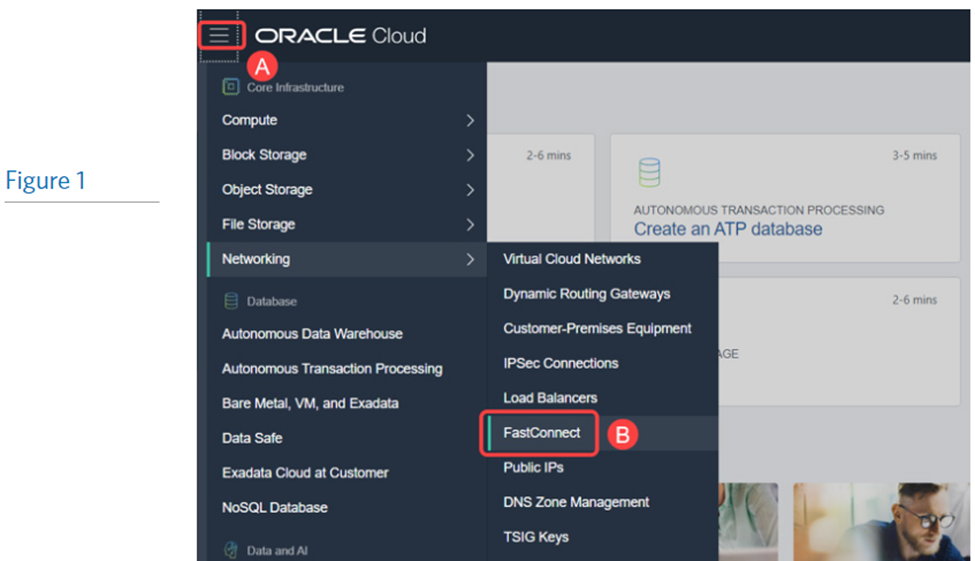
- Under ‘Core Infrastructure’, select ‘Networking’ and then click on ‘FastConnect’. (Figure 1B)
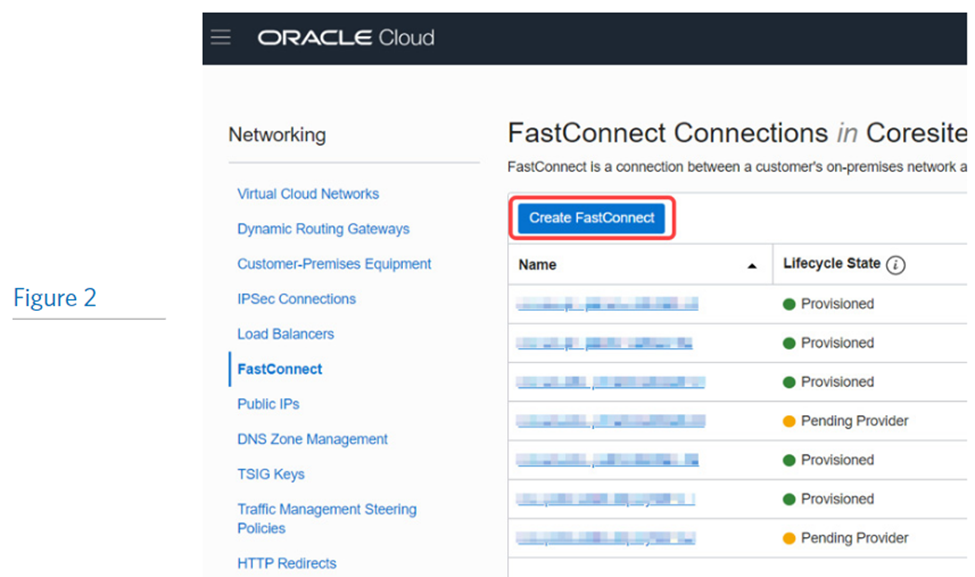
- Click on the ‘Create FastConnect’ button.
- Choose ‘Use Oracle Provider’. (Figure 3A)
- Choose ‘CoreSite: Open Cloud Exchange’ in the ‘PROVIDER’ drop-down menu. (Figure 3B)
- b. Click the ‘Next’ button.

NOTE: From here you will either chose a PUBLIC or PRIVATE VIRTUAL CIRCUIT. Please refer to either the Private or Public Virtual Circuit ordering in the following steps.
ORDERING A PRIVATE VIRTUAL CIRCUIT (SEE PAGE 5 FOR ORDERING A PUBLIC VIRTUAL CIRCUIT)
- Choose ‘Private Virtual Circuit’ under ‘VIRTUAL CIRCUIT TYPE’. Complete the following fields accordingly (Figure 4A):
Name (Optional): | Name the FastConnect virtual circuit. |
Compartment: | Choose the appropriate compartment. This is where the FastConnect circuit will be provisioned. |
Dynamic Routing Gateway In (Compartment Name here): | Choose an existing Dynamic Routing Gateway (aka DRG). |
Provisioned Bandwidth: | Choose your desired bandwidth. The choices are 1, 2, 5 or 10 Gbps. |
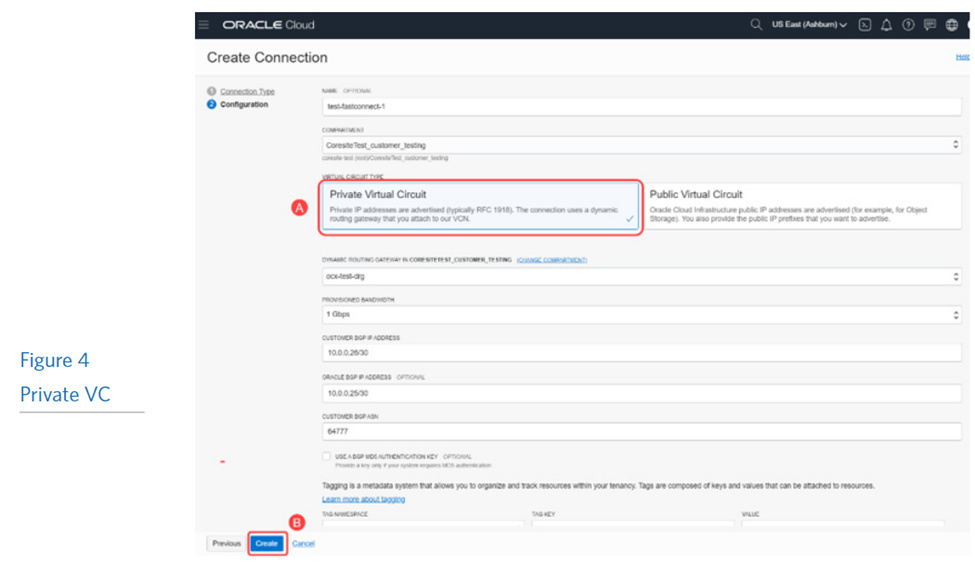
Customer BGP IP Address: | Enter a private IP address (within RFC-1918 range) for your on-premises router: 1. This needs to be a /30 subnet (255.255.255.252) and will be the last host. 2. Must be in a CIDR format (e.g., 10.0.0.22 /30). 3. If the IP address is already in use within the selected DRG (see Step 4c), it will inform you before you can proceed to create the FastConnect circuit. (Figure 5) |
Oracle BGP IP Address (Optional): | Enter a private IP address (within RFC-1918 range): 1. This needs to be a /30 subnet (255.255.255.252) and will be the first host. 2. Must be in a CIDR format (e.g., 10.0.0.21 /30). 3. If the IP address is already in use within the selected DRG (see Step 4c), it will inform you before you can proceed to create the FastConnect circuit. (Figure 5) |

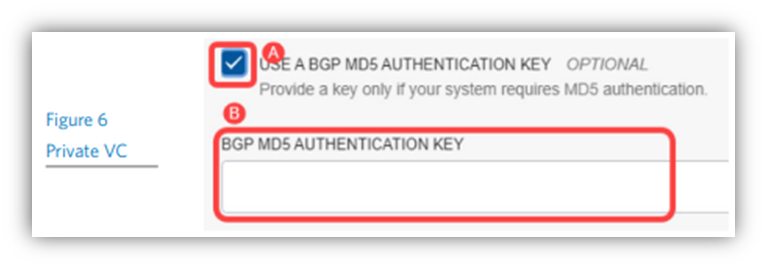
Customer BGP ASN: | Enter an AS number belonging in the private range (e.g., 64555). h. (Optional) USE A BGP MD5 AUTHENTICATION KEY: Check mark the box if your system requires MD5 authentication. (Figure 6A) 1. If you choose to select this option, a field will appear where you must enter the BGP MD5 authentication key. (Figure 6B) a. Click on the ‘Create’ button. (Figure 4B) |
- Wait for the FastConnect virtual circuit to be created.
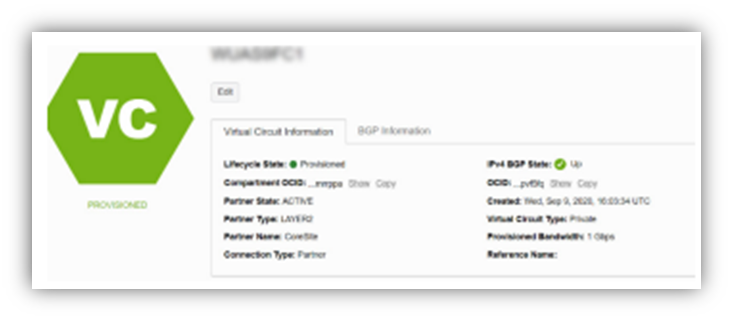
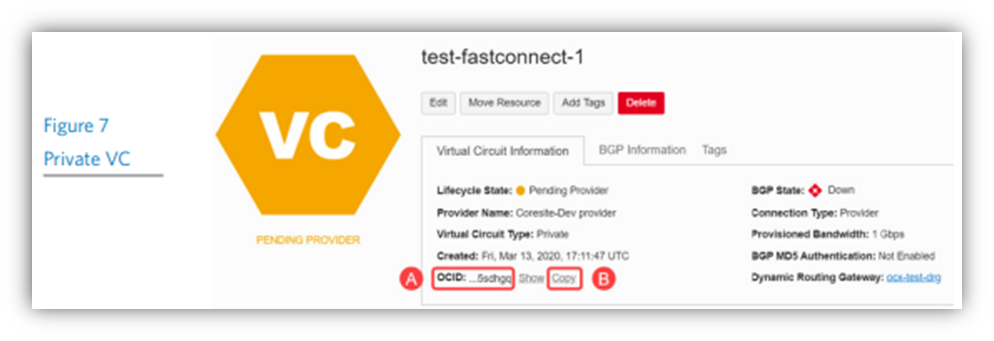
- Once complete, an OCID key will be listed next to ‘OCID’ in an abbreviated format. (Figure 7A)
ORDERING A PUBLIC VIRTUAL CIRCUIT
(See page 3 for ordering a Private Virtual Circuit)
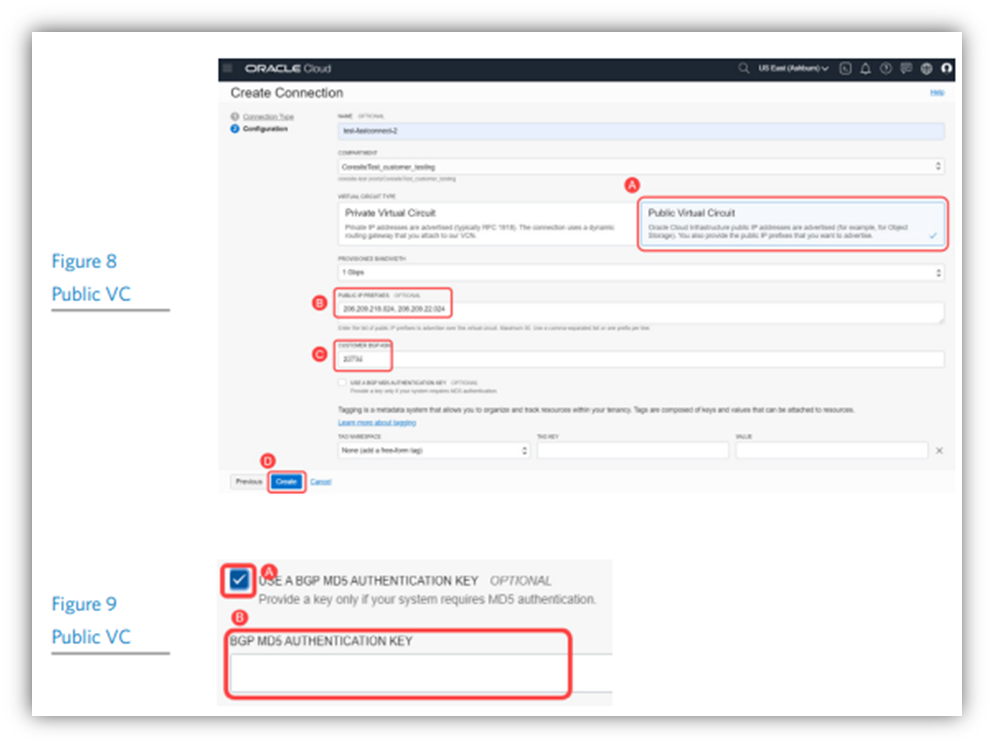
- Choose ‘Public Virtual Circuit’ under ‘VIRTUAL CIRCUIT TYPE’. Complete the following fields accordingly: (Figure 8A)
Name (Optional): | Name the FastConnect virtual circuit. |
Compartment: | Choose the appropriate compartment. This is where the FastConnect circuit will be provisioned. |
Provisioned Bandwidth: | Choose your desired bandwidth. The choices are 1, 2, 5 or 10 Gbps. |
Public IP Prefixes (Optional): | Enter the list of public IP prefixes you own to advertise over this virtual circuit. (Figure 8B) 1. You can add public IP prefixes later within the FastConnect virtual circuit. 2. Oracle will verify ownership of each prefix. 3. Maximum 50 prefixes. 4. Use a comma-separated list or one prefix per line. |
Customer BGP ASN: | Enter your AS number. (Figure 8C) |
Usea BGP MD5 Authentication Key: | Checkmark the box if your system requires MD5 authentication. (Figure 9A) 1. If you choose to select this option, a field will appear where you must enter the BGP MD5 authentication key. (Figure 9B) |
- Click on the ‘Create’ button. (Figure 8D)
- Wait for the FastConnect virtual circuit to be created.
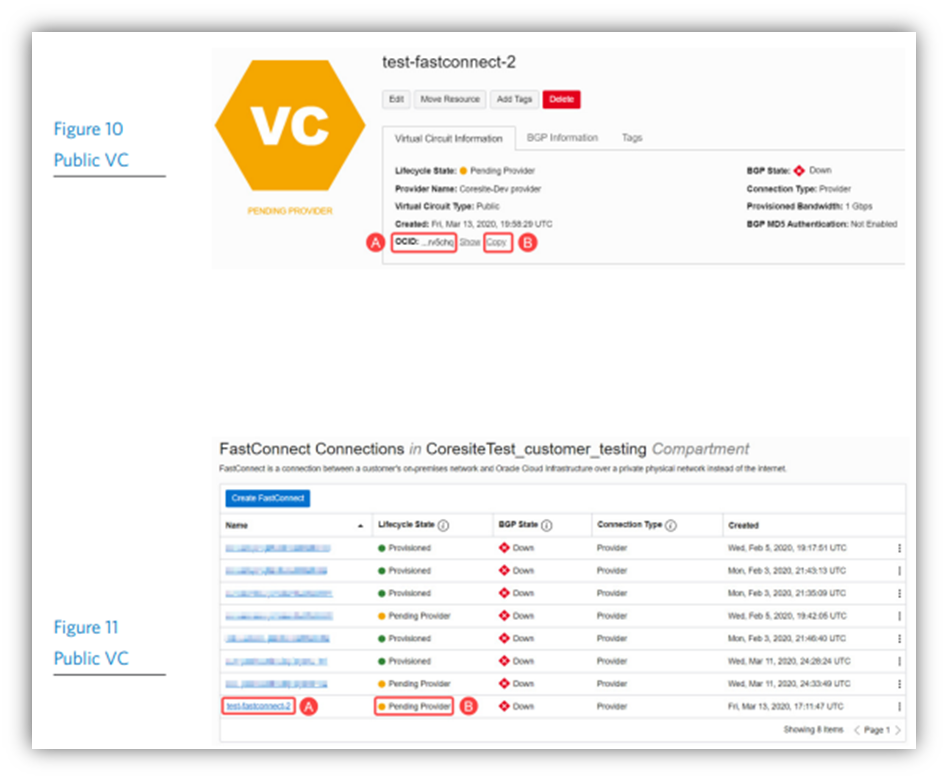
- Once complete, an OCID key will be listed next to ‘OCID’ in an abbreviated format. (Figure 10A)
- Click on the ‘Copy’ button just to the right of the OCID key and save it somewhere (e.g., Notepad, Slack, etc.). (Figure 10B);
- You will be required to enter and validate the OCID key when you order your Open Cloud Exchange EVC;
- The Lifecycle State will be ‘Pending Provider’. (Figure 11B);
- The newly created FastConnect virtual circuit will now be listed within the FastConnect dashboard. (Figure 11A)
STEP 2: ORDERING YOUR OPEN CLOUD EXCHANGE EVC
- Login to the MyCoreSite customer service delivery platform.
- Select Order Services and Support.
- Choose Interconnection.
- Order OCX.
- Select EVC.
- Click Order.
New EVC(s) Order Form: Oracle
- Input Contact Information:
- Select Account and Site;
- Enter the Point of Contact (Up to 5 contacts).
- Select Target:
- Account: Oracle Cloud FastConnect;
- Oracle Cloud Identifier (OCID): Captured in Figure 7;
- Port: Select target port 3. Enter Buyer Details;
- Port: Populate buyer port;
- Buyer VLAN (Available range: 400-899 or leave blank for auto selection);
- Service Rate: 1, 2, 5 or 10 Gbps;
- Name your EVC;
- Enter a Description
- Agree to Terms and Conditions
- Click "Submit Order"
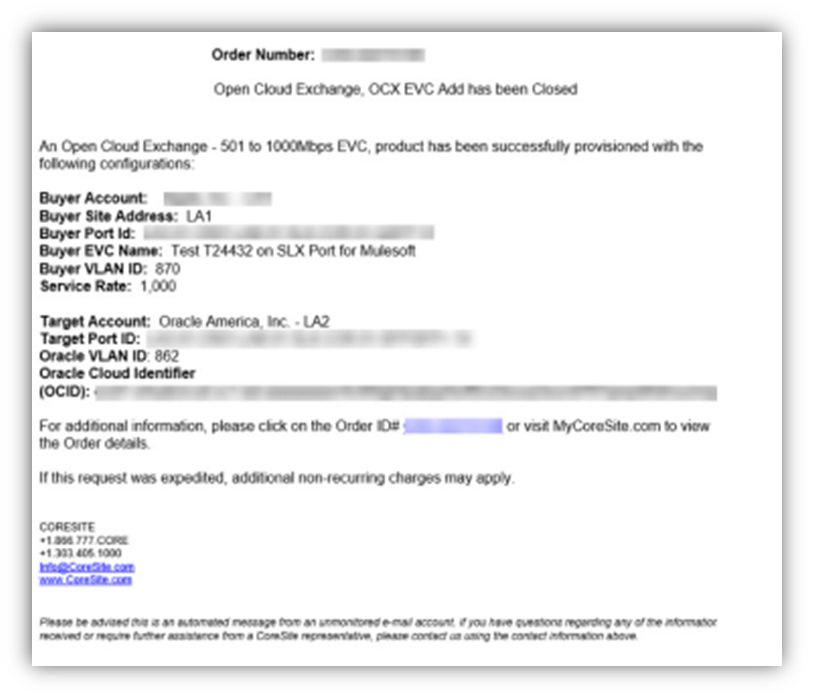
STEP 3: CONFIRMING YOUR CIRCUIT
- After submitting the order, the EVC(s) will be configured, and confirmation emails are sent to the buyer and target with the connection details including the relevant buyer and target VLAN information.
- After you’ve ordered your EVC in the CoreSite Customer Service delivery platform you will see your Virtual Circuit in the Oracle Cloud Console turn green and listed as “Provisioned”.