Microsoft Azure Credentials & Resources

What are "Credentials"?
The CoreSite OCX utilizes programmatic access to create Layer 3 connections to Microsoft Azure and requires users to provide credentials to establish connectivity.
Why are these needed? When users create a layer 3 connection to Microsoft Azure, the CoreSite OCX also creates the cloud resources below on behalf of the customer. To create such cloud resources, CoreSite requires the user/account Credentials to be provided.
Microsoft Azure resources created:
- Virtual Network (VNet)
- Gateway subnet (in created VNet)
- Virtual Network Gateway
- Virtual Network Gateway Public IP address
The credentials required are limited to what is outlined below and should not be the user’s root credentials. These credentials are created in the cloud provider console and can be retrieved after creation.
Azure credentials required:
ExpressRoute (ER) Service Key: | The key is the unique identifier assigned by Microsoft to identify your ER circuit. |
Client ID: | This value represents the ID tied to a specific Azure client. This is also referred to as the “Application ID”. |
Client Secret ID (Value): | This is the unique identifier used to authenticate your application. |
Subscription ID: | Represents the unique identifier for your Azure Subscription. |
Tenant ID: | Represents the unique identifier of the Azure Active Directory instance. This is also referred to as the “Directory ID”. |
Resource Group: | A container that holds related resources for an Azure solution. |
Resource Group Region: | The region in which the resource group will be stored. |
ExpressRoute Circuit Name: | This is a unique identifier that the circuit creator assigned to the ER Circuit. |
Network Contributor Role | This role must be enabled for the user to be authenticated using the key credentials above |
How to obtain your Microsoft Azure Credentials
SUBSCRIPTION ID
- In the Azure Portal, locate the navigation panel on the left side of the screen and click “Subscriptions”. You may also use the search function if this does not appear on the navigation pane.
- Select the subscription ID you wish to use and copy / record the value:
- If you do not have any existing subscriptions, you may create one.
NOTE: Subscription ID can also be located in the details section of your ER Circuit.
CLIENT ID AND TENANT ID
- In the Azure Portal, locate the navigation panel on the left side of the screen and click “Azure Active Directory”. You may also use the search function if this does not appear on the navigation pane.
- Click on “App Registrations”.
- Locate the application you wish to use and click on the display name:
- If you do not have any existing applications, you may create one.
- For more information on creating App registrations please refer to: https://learn.microsoft.com/en-us/azure/active-directory/develop/quickstart-register-app
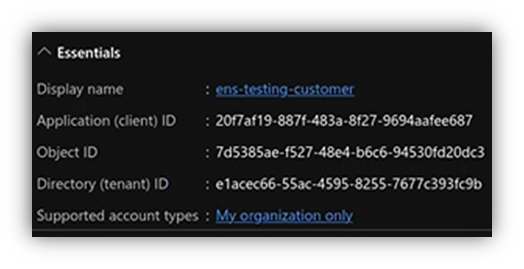
- Once the application details appear, copy / record the values for the:
- Client ID (Application ID);
- Tenant ID (Directory ID).
CLIENT SECRET ID
- In the Azure Portal, locate the navigation panel on the left side of the screen and click “Azure Active Directory”. You may also use the search function if this does not appear on the navigation pane.
- Click on “App Registrations”.
- Click “Certificates and Secrets”.
- Select “Client Secrets”.
- Locate the secret you wish to use:
- If you do not have any existing secrets, click “New Client Secret”;
- Enter a description and designate the duration;
- Click “Add”.
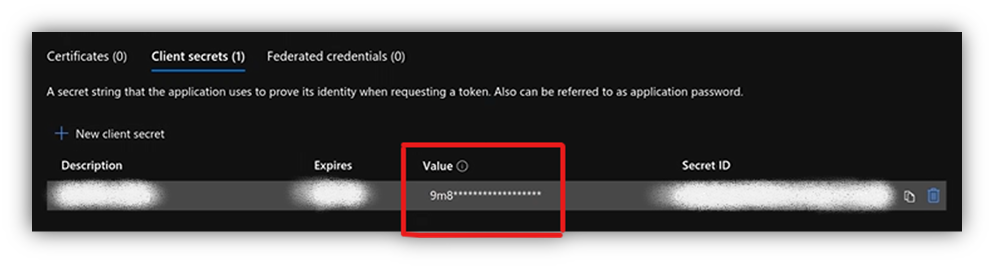
*IMPORTANT: Users must copy the value represented in the “Value” column. Do not record the value in the “Secret ID” column. The Secret Value will only be displayed once and cannot be retrieved again after it is displayed. It is critical that users retain/store that value in a secure location.*
RESOURCE GROUP AND RESOURCE GROUP REGION
- In the Azure Portal, locate the navigation panel on the left side of the screen and click “Resource Groups”. You may also use the search function if this does not appear on the navigation pane.
- Locate the Resource Group you wish to use:
- If you do not have any existing secrets, click “Add”
- Select a subscription model
- Provide a name for the resource group
- Select “Region”
- Click “Review + Create”
- Copy / record the values for the Resource Group and Resource Group Region.
NOTE: The Resource Group, and Resource Group Region is assigned to the ER Circuit upon creation in the Azure Portal.
EXPRESSROUTE CIRCUIT NAME
- In the Azure Portal, locate the navigation panel on the left side of the screen and click “ExpressRoute Circuits”. You may also use the search function if this does not appear on the navigation pane.
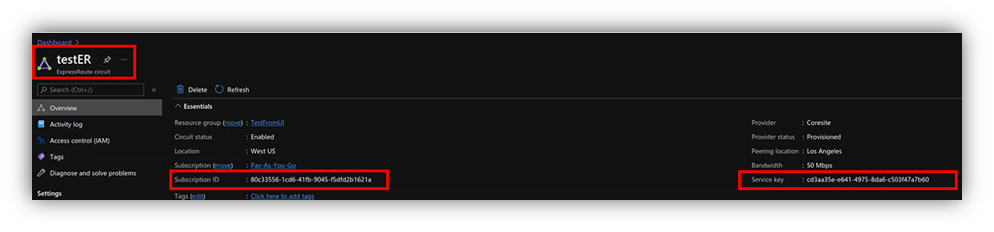
- Locate the ExpressRoute Circuit you wish to use. The name of the circuit will be displayed on the list view:
- You may also click on the circuit to view more details. The ER Circuit name will be displayed on the top left corner of the page;
- Other credentials can also be viewed here such as the Subscription ID and the ExpressRoute Service Key.
CREATING AN EXPRESSROUTE CIRCUIT
- Log into the Microsoft Azure portal.
- Once logged in, click the “ExpressRoute Circuits” button on the navigation pane on the lefthand side of the screen. If that button is not available, navigate to the search bar at the top of the screen or hit the “Browse” button and search for “ExpressRoute Circuits”.
- Click “Add”.
- Enter Circuit Name.
- Select Provider.
- Choose Peering Location.
- Set Bandwidth.
- Select SKU.
- Choose Billing Model.
- Select Subscription.
- Determine Resource Group.
- Choose Location (Correlates to Azure Region).
- Click “Create”.
Enabling the Network Contributor Role
The last step to enabling the credentials retrieved above is to enable the "Network Contributor" role within the desired application registration inside the Microsoft Azure Console. This role must be assigned to the correct "App registration" and not the individual user.
- In the Azure Portal, locate the navigation panel on the left side of the screen and click “Subscriptions”. You may also use the search function if this does not appear on the navigation pane.
- Click on Subscription you wish to use.
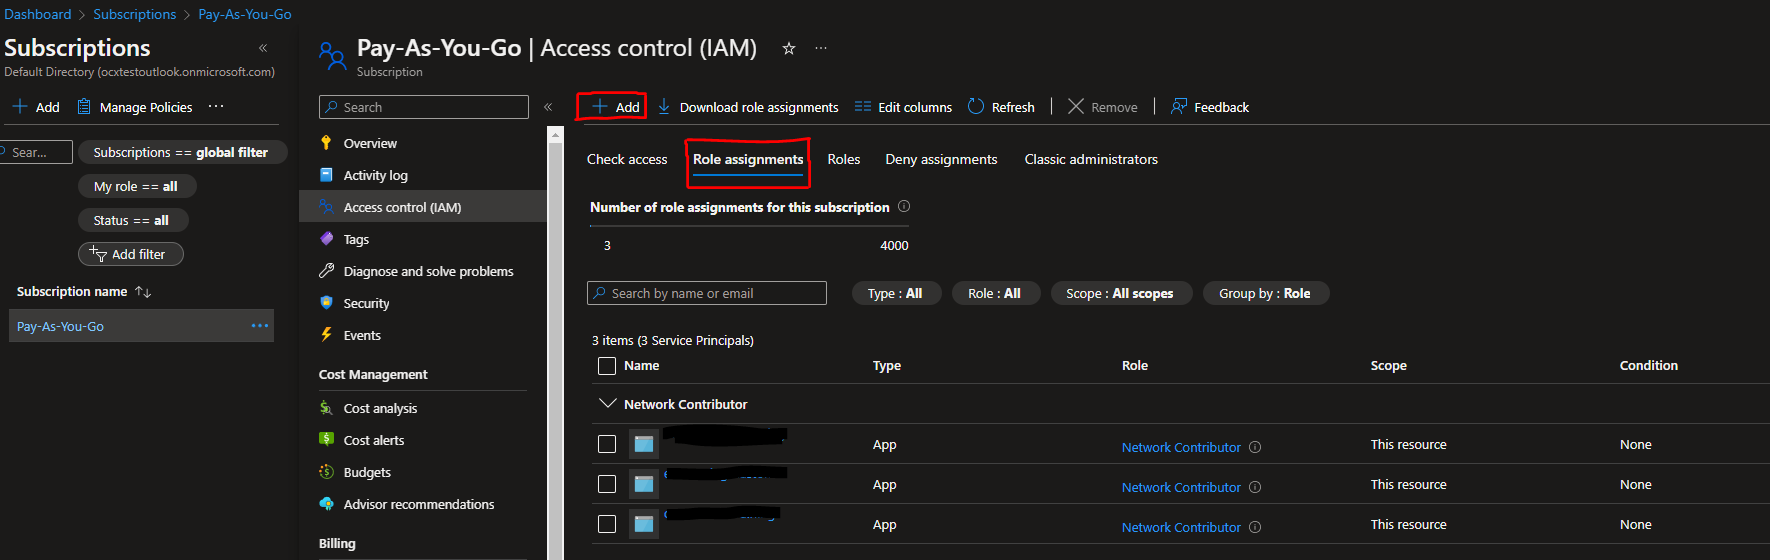
- A sub menu will appear. From there, locate and click on "Access Control (IAM)"
- Click on "Role Assignments"
- From here, Users/Groups assigned with the Network Contributor role will appear.
- If the user/group in question does not have the Network Contributor role, Click "add"
- Select "Add role assignment"
- A new screen will appear labeled "Add role Assignment". Under the "Roles" tab, search for "Network Contributor" in the search bar.
- Select "Network Contributor"

- Click "Next" at the bottom of the page.
- From the "Members" page under the Assign access to category, click "User, group, or service principal"
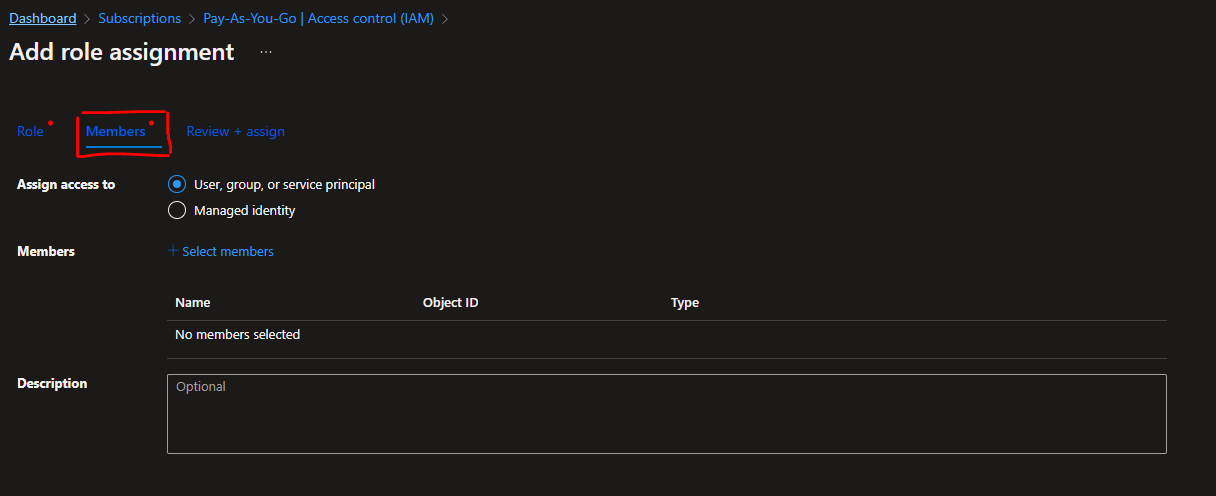
- Click "Select members"
- A side menu will appear labeled "Select Members". Search for the application you wish to use/assign the Network Contributor role to. To view a list of current app registrations under your Microsoft Azure account, follow steps 1 and 2 outlined under the "Client ID and Tenant ID" section above.
***NOTE: Ensure the correct Application Registration is selected. If the incorrect app registration is selected the credentials will not be authenticated.*** - Once you have selected the correct App Registration, click "Next" at the bottom of the page.
- A confirmation page will appear. From there, if all information parameters are correct click "review + assign"
For more information, please go to the links below:
- https://docs.microsoft.com/en-us/azure/azure-resource-manager/management/manage-resource-groups-portal
- https://docs.microsoft.com/en-us/linkedin/shared/api-guide/best-practices/secure-applications
- https://docs.microsoft.com/en-us/azure/app-service/configure-authentication-provider-aad
- https://docs.microsoft.com/en-us/azure/active-directory/develop/howto-create-service-principal-portal#get-application-id-and-authentication-key
- https://docs.microsoft.com/en-us/azure/expressroute/expressroute-howto-circuit-portal-resource-manager